An on-line video tutorial is available, click here to view it.
The user interface was made to allow for both simple and complex file conversion tasks.
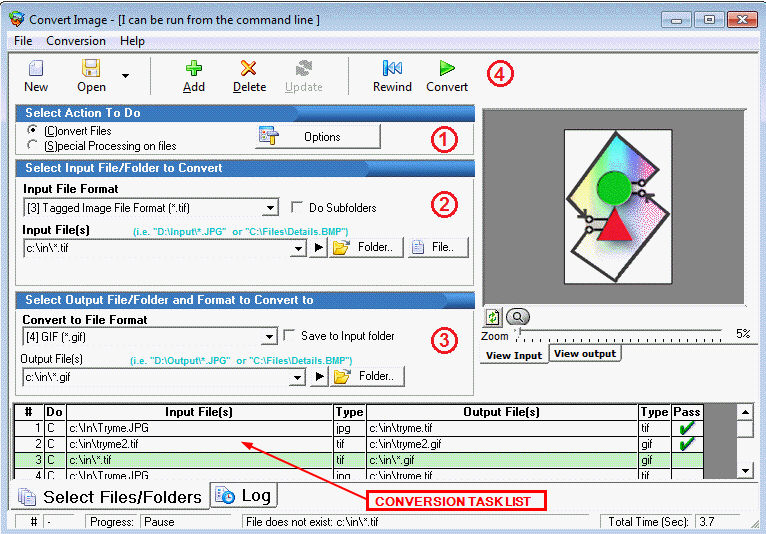
For a conversion job, you will need to do the following 4 steps:
(1) Select (C)onvert Files as the action to do. Click the Options button to choose which pages, image quality etc.
(2)
Select the input file(s) to be converted from the " File" or "
 Folder" buttons. If you select
a folder of files to convert, you will need to specify
it properly by using the "C:\INPUTPATH\*.EXT"
format, where EXT is the file
extension of the input files (e.g. C:\Samples\*.jpg).
Folder" buttons. If you select
a folder of files to convert, you will need to specify
it properly by using the "C:\INPUTPATH\*.EXT"
format, where EXT is the file
extension of the input files (e.g. C:\Samples\*.jpg).
(3)
Select the output file(s) location from the file "
File" or "
Folder" buttons. If a destination
folder doesn't exist this software will create it for you automatically.
(4) Optional: If you are going to specify more than one conversion item, press the Add (or ALT-A) button on the tool bar to add to the conversion task list.
Press Convert ( or F5) when ready to begin the conversion job.
Repeat steps 1-4 as many times as necessary to create a Conversion Job with multiple Conversion Tasks. Conversion jobs can be saved, restored, and edited; they may also be run from the scheduler or command line. See the File menu to save or restore a conversion job.
In the picture above it shows the settings to convert every TIF found to a GIF file. Notice the proper way to specify all files in a folder by using the asterisk: *.TIF and *.GIF. The next topic discusses converting whole folders of files in more detail.
 The
Quick Launch Buttons
The
Quick Launch Buttons
Quick launch buttons are extremely helpful. They are located immediately to the right of the input and output file specification area and when clicked they will open the files specified in their default editor. If a folder of files is specified the quick launch button will open Windows Explorer using that specific folder for your viewing purposes. Use these quick launch buttons to easily check the content of the input and output file/folders before or after conversions.
Modifying items in the task list
If you would like to make changes to an existing conversion item in the conversion task list, highlight that entry by clicking on it (double click for options associated with the item). The details associated with the item will be displayed in the upper portion of the user interface. Make whatever changes are necessary then click the Update button in order to save those changes.
A conversion task may be moved within the conversion task list. Doing so allows you to easily re-sequence the tasks within the job. Select the Conversion menu item or the RIGHT MOUSE CLICK to open a pop-up menu item as shown below. CTRL-U and CTRL-D will also move a conversion item up and down respectively.
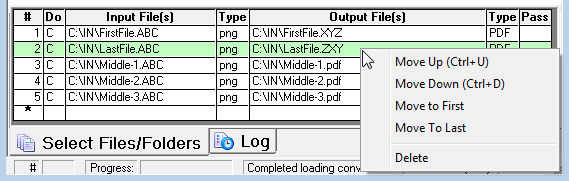
Right mouse clicking over a conversion item displays the menu shown above.
Using non-standard file extensions
If your input or output files do not use standard file extensions you will have to specify the file type in the appropriate File Format drop down list box.
See Also:
Converting Whole Folders of Files
Quick Start - Special Processing on Files
|
Softinterface Tools |
'Convert Image' Information |
Site Info |
|
||
|
Making great software tools since 1999 |
|||||
|
|
|
||||
|
Copyright © by Softinterface®, Inc. All Rights Reserved. |
|
|