NOTE: An on-line video tutorial is also available.
This section discusses the user interface in detail. Two simple concepts, conversion task and conversion job must be quickly introduced.
Obviously, before 'Convert Image' can do anything, you the user must specify what exactly is to be done. Each 'item' to be done is considered a conversion task. You specify a conversion task in the upper part of the program's user interface, and once completely specified, optionally press the Add (or ALT-A) button. As you add conversion tasks, you will see them listed sequentially in the bottom portion of the user interface within the conversion task list.
You may edit a conversion task by first selecting it in the conversion task list with a mouse click. After changing the settings, click the Update button (or ALT-U) in the upper tool bar. Double clicking on a conversion task list item will open the Options form associated with the conversion item.
NOTE: The word "task" is used often in this manual, and is meant to refer to a single operation that shows up as a single row in the conversion task list.
When specifying a task, the very first thing you choose is whether it is going to be a conversion or special process task. File conversion takes a file and changes its type (e.g. from JPG to TIF, or from BMP to GIF, etc.).
If you are doing a conversion task, you'll also specify the input and output file(s). The Options button provides additional specifications.
One or more conversion tasks can be grouped together and are referred to as a Conversion Job which is discussed next.
A conversion job consists of those conversion tasks that you've specified and added to the conversion task list. Conversion jobs can be saved, edited and restored for future runs, saving you an enormous amount of time. See the File menu for saving and restoring conversion jobs. Conversion Job files have an *.SII file extension (SII is for SoftInterface,Inc).
When you save a conversion job the file name has a *.SII extension (e.g. "c:\my jobs\MonthlyJob.SII"). There are several ways to use this conversion job file:
1. You can reload the file from the user interface from the File menu item.
2. You can double click the file from Windows Explorer to have run the conversion job. NOTE: If the file has #OPEN.SII at the end of the filename then the 'conversion job' will only be opened for editing.
3. You can specify the file within the command line with the /J switch. For more information see Specifying a 'Conversion Job' File from the command line.
4. You can use the file within the built in scheduler.
NOTE: Sample conversion jobs have been included with your installation demonstrating the functionality of 'Convert Doc'. You may find it instructive to view the various conversion job files (*.sii) and examine the settings found there for each conversion task. See the Start\Programs\Convert Image\Example Conversion Jobs item for the supplied demos. These demos assume you've installed in the default installation folder.
The user interface was made to allow for both simple and complex conversion jobs. To perform a conversion task, first specify it in the upper area of the user interface, and then optionally click the Add (or ALT-A) button (in the upper tool bar) to add it to the conversion task list. If you are only going to have one conversion task, then don't bother with the Add button.
When you are ready to begin you can press the Convert (or F5) button to initiate the conversion job.
You can build conversion jobs, consisting of one or more conversion tasks, which may be saved, restored, and edited. Once saved, they may also be specified and run from the scheduler or command line, making automating complex tasks a snap. See the File menu for saving and restoring conversion jobs.
Editing, moving or removing conversion tasks within a conversion job is very simple.
To edit a task first highlight it (left mouse click) in the conversion task list. When you've selected the task, all its conversion properties will be properly displayed in the upper portion of the user interface. Modify the conversion task properties as necessary and then press the Update button (or ALT+U). This saves the changes to the conversion task list. Note: Failure to press Update will cause the changes to be lost if you have more than one conversion item.
To remove a task, highlight it in the task list, and then press the Delete button (or ALT+D).
A conversion task may be moved within the conversion task list. Doing so allows you to easily re-sequence the tasks within the job. Select the Conversion\Move Conversion Task menu item or the right mouse click over the conversion task to open a pop-up menu item. Menu items Move Up, Down, First, and Last will be visible as shown below. Note: CTRL-U and CTRL-D also move a conversion item up and down respectively.
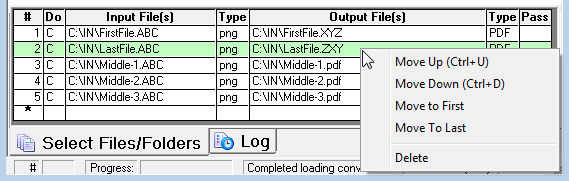
Right mouse clicking over a conversion item displays the menu shown above.
You may save a conversion job for later use by using the File\Save menu item (or CTRL+S). You may pause in the middle of a conversion job and then save it. Reloading will bring the program back to where it left off on the job.
IMPORTANT!!! Be certain to REWIND before you save a conversion job file if you want to start from the beginning the next time you open the job.
Opening a conversion job is just as simple. Use the File\Open Conversion Job menu item (or CTRL+O). Conversion Job files have an *.SII file extension (SII is for SoftInterface, Inc). The program will automatically list the most recently used conversion job files in the File menu for quick and easy access.
NOTE: Sample conversion jobs have been included with your installation demonstrating many of the features and functionality of this product. You may find it instructive to view the various (*.sii) conversion jobs and examine the settings found there for each conversion task. See the Start\Programs\Convert Image\Example Conversion Jobs item for the supplied demos. These demos assume you've installed in the default installation folder
If you want to start fresh, you can begin a new Conversion Job by clicking the New button on the tool bar, selecting the File\New Conversion Job menu item, or by pressing CTRL+N.
NOTE: Creating a new conversion job completely erases all items currently in the conversion task list.
The Log tab near the very bottom of the program contains any problem files encountered during a conversion. If any entries exist in the Log, you can save them as a conversion job for processing at a later time, with different methods. See the File\Save Log as a Conversion Job menu item to use this.
See Also:
Quick Start - Converting Files
Quick Start - Special Processing on Files
|
Softinterface Tools |
'Convert Image' Information |
Site Info |
|
||
|
Making great software tools since 1999 |
|||||
|
|
|
||||
|
Copyright © by Softinterface®, Inc. All Rights Reserved. |
|
|